

Copy the SAS URL and install AzCopy
The first step is to download and install the AzCopy tool, which is the tool that you will run to upload PST files to Office 365.

You also copy the SAS URL for your organisation. This URL is a combination of the network URL for the Azure Storage location in the Microsoft cloud for your organization and a Shared Access Signature (SAS) key. This key provides you with the necessary permissions to upload PST files to your Azure Storage location. Be sure to take precautions to protect the SAS URL. It’s unique to your organization and will be used in Step 2.
- Go to https://protection.office.com and sign in using the credentials for an administrator account in your organization.
- In the left pane of the Security & Compliance Center, click Information governance > Import > Import PST files.
- On the Import PST files page, click
 New import job. The import job wizard is displayed.
 - Type a name for the PST import job, and then click Next. Use lowercase letters, numbers, hyphens, and underscores. You can’t use uppercase letters or include spaces in the name.
- On the Do you want to upload or ship data? page, click Upload your data and then click Next.

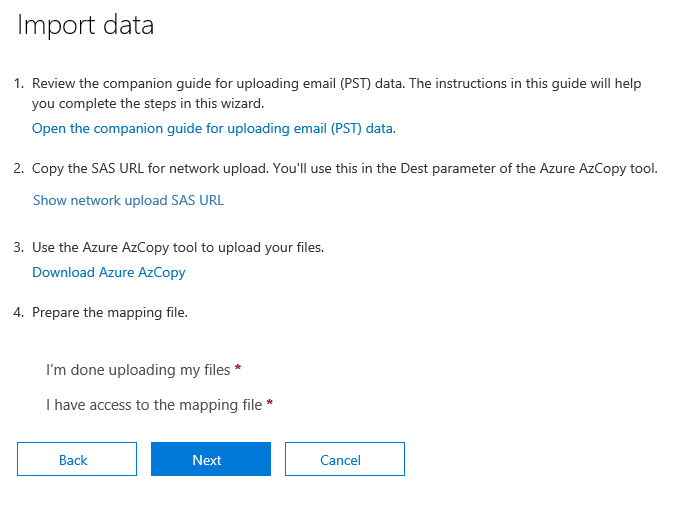
- On the Import data page, do the following two things:

- In step 2, click Show network upload SAS URL. After the SAS URL is displayed, click Copy to clipboard and then paste it and save it to a file so you can access it later. (May take a few moments to generate this URL)
- In step 3, click Download Azure AzCopy to download and install the AzCopy tool. In the pop-up window, click Run to install AzCopy.
Upload your PST files to Office 365
Now you’re ready to use the AzCopy.exe tool to upload PST files to Office 365. This tool securely uploads and stores the PST file(s) in an Azure Storage location in the Microsoft cloud. As previously explained, the Azure Storage location that you upload your PST files to is located in the same regional Microsoft datacenter where your organization is located. To complete this step, the PST files have to be located in a file share or file server in your organisation.
- Open AzCopy, or, open CMD and go to the directory where you installed the AzCopy.exe. If you installed the tool in the default location, go to
%ProgramFiles(x86)%\Microsoft SDKs\Azure\AzCopy. - Edit and then run the following command to upload the PST files to Office 365.
AzCopy.exe /Source:<Location of PST files> /Dest:<SAS URL> /V:<Log file location> /nc:2 /Y
You must specify a directory as the source location in the previous command; you can’t specify an individual PST file. All PST files in the source directory will be uploaded.
Syntax commands can be found HERE
After you run the command, status messages are displayed that show the progress of uploading the PST files. A final status message shows the total number of files that were successfully uploaded.

Step 3: Create the PST Import mapping file
After the PST files have been uploaded to the Azure Storage location for your organization, the next step is to create a comma-separated value (CSV) file that specifies which user mailboxes the PST files will be imported to. You’ll submit this CSV file in the next step when you create a PST Import job.
- Download a copy of the PST Import mapping file.
- Open or save the CSV file to your local computer. The following example shows a completed PST Import mapping file (opened in NotePad). It’s much easier to use Microsoft Excel to edit the CSV file.

In my scenario I have a folder on the C drive called PST where I have saved the JoeBloggs.pst file and in the above setps have now uploaded that PST to Azure store. That JoeBloggs.pst will be attached to mailbox JoeBloggs.companydomain.com, its not an archive and setting the TargetRootFolder and / means it will be put into the Inbox.
Step 4: Create a PST Import job
The next step is to create the PST Import job in the Import service in Microsoft 365. As previously explained, you submit the PST Import mapping file that you created in Step 3. After you create the job, Microsoft 365 analyzes the data in the PST files and then gives you an opportunity to filter the data that actually gets imported to the mailboxes specified in the PST import mapping file (see Step 6).
Now to continue where we left of in STEP 1
- On the Import data page, for step 4, click the I’m done uploading my files and I have access to the mapping file checkboxes, and then click Next.

- On the Select the mapping file page, click Select mapping file to submit the CSV mapping file that you created.
- After the name of the CSV file appears under Mapping file name, click Validate to check your CSV file for errors.

The CSV file has to be successfully validated to create a PST Import job. The file name is changed to green after it’s successfully validated. If the validation fails, click the View log link. A validation error report is opened, with an error message for each row in the file that failed.
- After the mapping file is successfully validated, read the terms and conditions document, and then click the checkbox.
- Click Save to submit the job, and then click Close after the job is successfully created. A status flyout page is displayed, with a status of Analysis in progress and the new import job is displayed in the list on the Import PST files page.
- Click Refresh to update the status information that’s displayed in the Status column. When the analysis is complete and the data is ready to be imported, the status is changed to Analysis completed. You can click the import job to display the status flyout page, which contains more detailed information about the import job such as the status of each PST file listed in the mapping file.
Step 5: Filter data and start the PST Import job
After you create the import job, Microsoft 365 analyzes the data in the PST files by identifying the age of the items and the different message types included in the PST files. When the analysis is completed and the data is ready to import, you have the option to import all the data contained in the PST files or you can trim the data that’s imported by setting filters that control what data gets imported.
- On the Import PST files page in the Security & Compliance Center, click Ready to import to Office 365 for the import job that you created in Step 5.

On the flyout page, click Import to Office 365.
The Filter your data page is displayed. It contains the data insights resulting from the analysis performed on the PST files by Office 365, including information about the age of the data. At this point, you have the option to filter the data that will be imported or import all the data as is. For me this is an old PST to be SAR searched, so all data will be imported.

- Do one of the following:
- To trim the data that you import, click Yes, I want to filter it before importing. For detailed step-by-step instructions about filtering the data in the PST files and then starting the import job, see Filter data when importing PST files to Office 365.Or
- To import all data in the PST files, click No, I want to import everything, and click Next.
- If you chose to import all the data, click Import data to start the import job. The status of the import job is display on the Import PST files page. Click
 Refresh to update the status information that’s displayed in the Status column. Click the import job to display the status flyout page, which displays status information about each PST file being imported.
